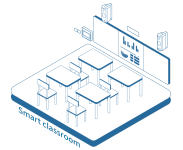
Recording and broadcasting of classroom construction programs have transformed modern education by making learning more accessible and interactive. These technologies allow you to share lessons beyond the classroom, ensuring students and educators can access valuable resources anytime. Programs like the iDste Recording Classroom Construction Solution lead this transformation with their innovative features. This system offers a highly integrated design adaptable to various classroom needs. It supports over 3,000 schools with customized solutions and enables real-time resource sharing. With automatic recording, simple operation, and centralized control, it ensures seamless teaching experiences for educators like you.
Key Takeaways
Recording and sharing lessons let students learn anytime, anywhere.
Use good camera angles, lighting, and sound for better videos.
Technology helps students and teachers work and talk together easily.
Saving lessons helps check progress and improve teaching later.
Pick equipment that fits your budget for the best setup.
Benefits of Recording and Broadcasting Classroom Construction Programs
Enhancing Learning and Engagement
Recording and broadcasting of classroom construction programs can significantly improve how students engage with lessons. By using techniques like proper camera angles, lighting, and sound quality, you can create a more immersive learning experience. For example:
Technique
Impact on Engagement
Camera Angles
Neutral, eye-level angles foster empathy and parity between presenter and audience, enhancing connection.
Lighting
Warm, frontal lighting promotes feelings of openness and approachability, making the presenter more engaging.
Sound Quality
Clear audio is crucial for comprehension, especially for non-native speakers, directly affecting learning outcomes.
These elements ensure that students remain focused and connected, whether they are in the classroom or learning remotely. When you implement these strategies, you make lessons more interactive and enjoyable for everyone.
Improving Communication and Collaboration
Classroom broadcasting fosters better communication and teamwork among students and educators. Tools like digital signage allow you to share updates or integrate current events into lessons seamlessly. Interactive platforms, such as Kahoot, encourage real-time participation, even from quieter students. Group activities also benefit from this technology, as they promote peer-to-peer discussions and teamwork.
Group projects often lead to better understanding. Studies show a 34.04% increase in test scores when collaborative models are used.
Social media platforms like X (formerly Twitter) let students showcase their work and engage in discussions using course-specific hashtags.
By leveraging these tools, you can create a dynamic learning environment that values every student's voice.
Expanding Accessibility and Scalability
Recording and broadcasting of classroom construction programs make education accessible to a broader audience. Students who cannot attend in person can still participate through live streams or recorded sessions. This approach also allows you to scale your teaching efforts. For instance, a single lesson can reach multiple classrooms or even schools, maximizing the use of educational resources.
Additionally, these programs help bridge gaps in education by providing equal opportunities for students in remote or underserved areas. When you adopt this technology, you ensure that learning knows no boundaries.
Documenting Progress and Outcomes
Recording and broadcasting of classroom construction programs provide an excellent way to document your teaching progress and outcomes. By recording lessons, you create a valuable archive of educational materials. These recordings allow you to review and analyze your teaching methods, helping you identify areas for improvement. They also serve as a reference for students who may need to revisit specific topics.
You can use these recordings to track student engagement and participation. For example, reviewing footage of classroom discussions can help you assess how well students interact with the material. This insight enables you to adjust your teaching strategies to better meet their needs. Additionally, documenting progress helps you measure the effectiveness of new teaching techniques or tools.
Sharing recorded lessons with colleagues can foster collaboration. When you share your methods and outcomes, you contribute to a collective pool of knowledge. This exchange of ideas benefits not only you but also your entire educational community. It encourages innovation and ensures that best practices are widely adopted.
Moreover, these recordings can serve as evidence of your teaching achievements. Whether you are applying for grants, certifications, or awards, having documented proof of your efforts strengthens your case. It also demonstrates your commitment to continuous improvement and excellence in education.
Essential Equipment and Tools for Recording and Broadcasting
Starting with a limited budget, you can still achieve excellent results by choosing affordable yet reliable equipment. Cameras like the Canon Vixia HF R800 and Sony Alpha a6400 offer great video quality for classroom recordings. For audio, consider the Shure SM58 microphone or the Rode Wireless Go II. These options provide clear sound, ensuring your lessons are easy to follow. If you need a compact solution, the Audio-Technica AT831b lavalier microphone is a great choice for capturing voices clearly.
Free or Low-Cost Software
You can enhance your recordings with free or low-cost software. Tools like OBS Studio allow you to record and live stream with ease. For editing, programs like DaVinci Resolve (free version) or Lightworks provide professional-grade features without breaking the bank. These tools help you create polished content that engages your audience.
Medium-Budget Options
Mid-Range Cameras and Audio Equipment
With a medium budget, you can upgrade to more versatile equipment. The Canon Vixia HF R800 camcorder remains a strong choice for its user-friendly design. Pair it with the Zoom H4n Pro audio recorder for high-quality sound. Lavalier microphones like the Audio-Technica AT831b offer excellent audio clarity, making them ideal for interactive classroom sessions.
Affordable Lighting and Tripods
Good lighting enhances video quality significantly. The Neewer 660 LED Video Light is portable and adjustable, making it perfect for various classroom setups. Combine it with a sturdy tripod to ensure stable and professional-looking recordings. These additions elevate the overall production value of your lessons.
High-Budget Options
Professional-Grade Cameras and Audio Systems
If you have a higher budget, investing in professional-grade equipment can transform your recordings. Cameras like the Sony Alpha a7 III deliver stunning visuals, while audio systems like the Rode Rodecaster Pro ensure crystal-clear sound. These tools provide a premium experience for both educators and students.
Advanced Editing and Broadcasting Software
For advanced editing and broadcasting, software like Adobe Premiere Pro and Wirecast offers unparalleled features. These tools allow you to add effects, transitions, and overlays, creating engaging and dynamic content. They also support seamless live streaming, making them ideal for large-scale classroom programs.
By selecting the right tools for your budget, you can optimize the recording and broadcasting of classroom construction programs. Whether you start small or go all-in, these options ensure your lessons reach their full potential.
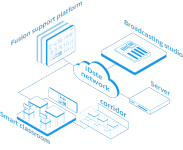
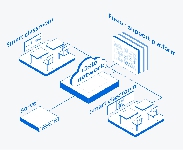
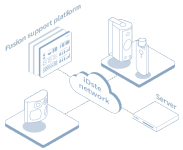
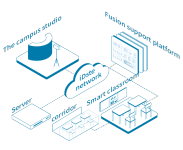
iDste Recording Classroom Construction Solution
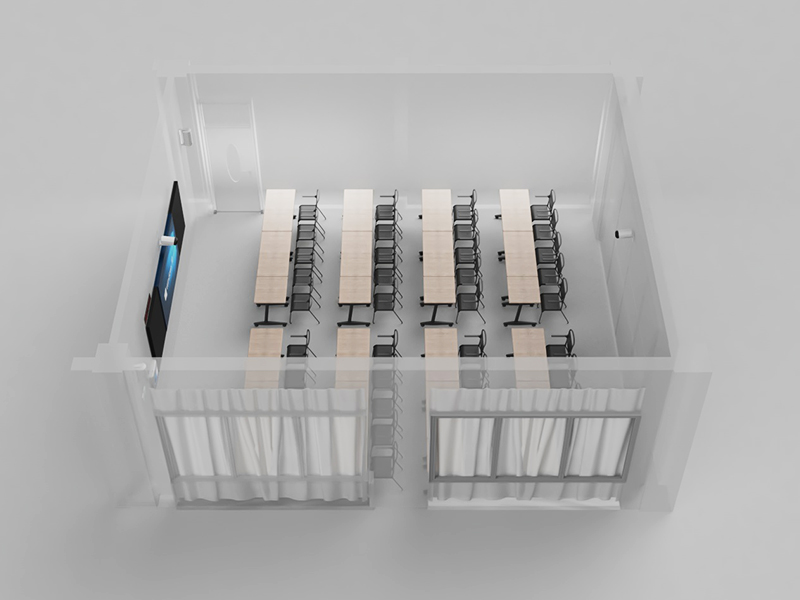
TM-03 and NC-03 Smart Classroom Systems
The TM-03 and NC-03 smart classroom systems form the backbone of the iDste solution. These systems simplify the process of recording and broadcasting classroom construction programs. With their user-friendly design, you can set up and operate them without technical expertise. The TM-03 system integrates seamlessly into your classroom, offering features like automatic recording and centralized control. The NC-03 system, designed as a cabinet-style terminal, provides a compact yet powerful solution for managing your classroom technology.
Both systems support real-time sharing of teaching resources. This means you can broadcast lessons to other classrooms or allow students to join remotely. These features make it easier to create an inclusive learning environment. Whether you are teaching in a single classroom or across multiple locations, these systems ensure smooth operation and high-quality results.
4K High-Definition Cloud Cameras
The iDste solution includes 4K high-definition cloud cameras that capture every detail of your lessons. These cameras provide crystal-clear video quality, ensuring that students can see and understand every aspect of the lesson. You can use them to record presentations, blackboard notes, and even student-teacher interactions. The cameras also support cloud storage, allowing you to save and access recordings from anywhere.
With their advanced features, these cameras enhance the learning experience for both in-person and remote students. They also help you create a valuable archive of educational materials. This makes it easier to review lessons, share resources, and improve your teaching methods.
Unified System Support Platform
The unified system support platform ties all the components of the iDste solution together. This platform allows you to manage recording, broadcasting, and resource sharing from a single interface. You can control cameras, microphones, and other devices with just a few clicks. The platform also supports mobile access, enabling students to join lessons from their smartphones or tablets.
By using this platform, you can streamline your teaching process and focus on delivering quality education. It eliminates the need for multiple systems, saving you time and effort. The unified approach ensures that all aspects of your classroom technology work together seamlessly.
With the iDste Recording Classroom Construction Solution, you can transform your teaching environment. Its advanced features and ease of use make it a top choice for educators looking to enhance their classrooms.
Step-by-Step Guide to Setting Up a Recording and Broadcasting System
Before setting up your system, define your goals. Are you recording lessons for remote students or creating a resource library? Knowing your audience helps you tailor the setup. For example, younger students may need simpler visuals, while older students might benefit from detailed presentations. Clear objectives ensure your system meets your teaching needs.
Choosing the Right Equipment
Select equipment that aligns with your goals and budget. For basic setups, consider the Logitech C920 webcam for video and the Nolan MIC2 Bluetooth microphone for audio. If you need a wider view, use a wide-angle lens like the Luxsure® Universal 3-in-1 Clip Lens Kit. These tools provide reliable performance without overwhelming complexity.
Setting Up Hardware
Positioning Cameras and Microphones
Proper placement ensures high-quality recordings. Position the camera in landscape mode to capture a wider view of the classroom. Use a wide-angle lens to include more details. Place the microphone close to the speaker for clear audio. Avoid backlighting by ensuring the room is well-lit. These practices enhance the overall quality of your recordings.
Ensuring Proper Lighting
Lighting plays a crucial role in video clarity. Use adjustable lights like the Neewer 660 LED Video Light to illuminate the classroom evenly. Avoid shadows by placing lights in front of the subject. Proper lighting makes your videos more professional and engaging.
Integrating Software
Installing and Configuring Recording Software
Choose software that simplifies recording. Tools like OBS Studio or vMix allow you to manage multiple camera inputs and record high-quality videos. Install the software on your teaching computer and configure it to match your equipment. Test the settings to ensure smooth operation.
Setting Up Live Streaming Platforms
For live streaming, platforms like Wirecast or XSplit Broadcaster are excellent choices. These tools support multiple cameras and allow you to stream to platforms like YouTube or Zoom. Configure the platform to integrate with your recording software. This setup ensures seamless live broadcasts for your audience.
Tip: Keep your videos between 15-20 minutes to maintain student focus and engagement.
Testing and Troubleshooting
Conducting Test Runs
Before you begin recording or broadcasting, running a test ensures everything works as expected. Start by setting up all your equipment, including cameras, microphones, and lighting. Turn on your recording software and check if it detects all devices. Adjust the camera angles to capture the classroom effectively. Speak into the microphone and play back the audio to confirm clarity.
Tip: Use a checklist to verify each component. For example, ensure the camera is focused, the microphone is positioned correctly, and the lighting is even.
Run a short recording session to test the system. Record a few minutes of video and review it for quality. Look for issues like blurry visuals, uneven lighting, or muffled audio. If you plan to live stream, conduct a private stream to check the internet connection and platform settings. Testing helps you identify and fix problems before the actual session.
Addressing Common Technical Issues
Even with preparation, technical issues can arise. Knowing how to handle them saves time and reduces frustration. Here are some common problems and solutions:
Poor Audio Quality: If the sound is unclear, check the microphone placement. Move it closer to the speaker and ensure there are no background noises. Replace the batteries if you use wireless microphones.
Blurry Video: Adjust the camera focus manually or switch to autofocus. Clean the camera lens with a microfiber cloth to remove smudges.
Connectivity Problems: For live streaming, ensure a stable internet connection. Use a wired connection instead of Wi-Fi for better reliability.
Software Crashes: Restart the software and close unnecessary programs running in the background. Update the software to the latest version for improved stability.
Note: Always keep spare equipment, like extra microphones or cables, to handle unexpected failures quickly.
By testing and troubleshooting effectively, you ensure smooth and professional recordings or broadcasts.
Common Challenges and Mistakes to Avoid
Technical Issues
Poor Audio or Video Quality
Clear audio and video are essential for effective classroom recordings. Poor quality can distract students and reduce their ability to focus. Up to 75% of a student's day involves listening, so ensuring clear sound is critical. You can improve audio by connecting microphones to digital recording systems or installing multiple microphones in the classroom to capture all voices. High-fidelity audio streaming software also enhances clarity.
"Teachers using amplification report improved student attention, fewer distractions, and less need to repeat instructions."
For video, blurry visuals often result from improper camera focus or dirty lenses. Regularly clean the lens and adjust the focus to ensure sharp images. These small steps can significantly improve the quality of your recordings.
Connectivity Problems
Unstable internet connections can disrupt live broadcasts. To avoid this, use a wired connection instead of Wi-Fi whenever possible. Test your internet speed before streaming to ensure it meets the platform's requirements. Keeping backup equipment, like a mobile hotspot, can also help you stay prepared for unexpected issues.
Budget Constraints
Overlooking Affordable Alternatives
Budget limitations often lead to compromises in equipment quality. However, you can find cost-effective solutions by exploring refurbished or gently used equipment. Many local organizations offer grants for media education, which can help you acquire better tools without overspending.
Misallocating Resources
Spending too much on unnecessary features can strain your budget. Focus on essential items like cameras, microphones, and lighting. Prioritize tools that directly impact the quality of your recordings. This approach ensures you get the most value from your investment.
Lack of Training or Expertise
Insufficient Knowledge of Equipment
Without proper training, even the best equipment can feel overwhelming. Spend time learning how to use your tools effectively. Many manufacturers provide free tutorials or user guides. Practicing with your setup before recording ensures smoother operation.
Inadequate Preparation for Live Broadcasts
Live broadcasts require careful planning. Forgetting to test your system can lead to technical glitches during the session. Always conduct a test run to check audio, video, and internet connectivity. This preparation minimizes errors and ensures a professional presentation.
Tip: Create a checklist for your setup to avoid missing any critical steps.
By addressing these challenges proactively, you can create a seamless recording and broadcasting experience for your classroom.
Legal and Privacy Considerations
Obtaining Consent from Students and Parents
When recording or broadcasting classroom activities, you must prioritize obtaining consent from students and their parents. This step ensures that everyone involved feels comfortable and respected. Start by clearly explaining the purpose of the recordings. Let parents and students know how the content will be used, whether for educational purposes, resource sharing, or remote learning.
You can use a simple consent form to gather approvals. Include details such as:
The type of content being recorded (e.g., lessons, discussions).
Where the recordings will be stored and shared.
How long the recordings will be kept.
Tip: Use plain language in your consent forms to make them easy to understand. Avoid technical jargon that might confuse parents or students.
Always provide an option for students or parents to opt out. Respect their decision and offer alternative ways for students to participate in lessons without being recorded. This approach builds trust and ensures compliance with ethical standards.
Complying with Privacy Laws
You must also follow privacy laws when recording and broadcasting classroom activities. These laws vary by region, but they generally aim to protect personal information. For example, in the United States, the Family Educational Rights and Privacy Act (FERPA) safeguards student data. You should familiarize yourself with the specific regulations in your area.
To comply, avoid sharing sensitive information in your recordings. Blur or exclude any personal details, such as student names or grades, from the footage. Use secure platforms for storing and sharing recordings. Platforms with encryption features provide an added layer of protection.
Note: Regularly review your recording practices to ensure they align with current privacy laws. Staying informed helps you avoid legal issues and maintain a safe learning environment.
By addressing consent and privacy, you create a respectful and legally compliant classroom recording system.
Cost-Effective Solutions and Best Practices
Leveraging Free or Open-Source Tools
You can significantly reduce costs by using free or open-source tools for recording and broadcasting. These tools provide professional-grade features without requiring expensive licenses. For video recording and live streaming, Open Broadcast Studio (OBS) is an excellent choice. It offers robust functionality and works well for both beginners and advanced users. If you need to edit videos, consider OpenShot for its simplicity or Shotcut for more advanced editing options.
For audio adjustments, Audacity is a reliable tool that allows you to enhance sound quality effortlessly. If your lessons involve annotating slides or creating digital notes, tools like OpenBoard and Xournal++ can help. These applications are user-friendly and work across multiple platforms. By incorporating these tools into your setup, you can create high-quality educational content without exceeding your budget.
Repurposing Existing Equipment
You don’t always need to buy new equipment to set up a recording system. Look around for devices you already own. A smartphone with a decent camera can serve as a recording device. Pair it with a tripod for stability, and you have a functional setup. Old laptops or desktop computers can also be repurposed for editing or streaming.
If you have unused microphones or webcams, test their quality before investing in new ones. Even older models can deliver satisfactory results with proper adjustments. By repurposing existing equipment, you save money while making the most of your resources.
Collaborating with Local Experts or Volunteers
Collaboration can be a powerful way to enhance your recording and broadcasting system. Reach out to local experts, such as videographers or tech enthusiasts, who might be willing to share their knowledge. Many communities have volunteers eager to support educational initiatives.
You can also involve students with an interest in technology. Assigning them roles in managing equipment or editing videos not only reduces your workload but also provides them with valuable skills. Collaboration fosters a sense of community and ensures your project benefits from diverse expertise.
Tip: Building partnerships with local organizations or schools can also open doors to shared resources, reducing costs further.
Prioritizing Key Features Over Extras
When setting up a classroom recording and broadcasting system, focusing on essential features ensures you get the best value for your investment. Prioritizing the right tools enhances the quality of your recordings without unnecessary expenses. Here are the key features to consider:
Microphones: Lavalier microphones, like the Audio-Technica AT831b, offer clear audio at an affordable price. Handheld options, such as the Shure SM58, are reliable for capturing voices in dynamic settings.
Cameras: For beginners, the Canon Vixia HF R800 provides ease of use and good video quality. If you need advanced visuals, the Sony Alpha a6400 delivers exceptional image clarity.
Audio Equipment: Devices like the Zoom H4n Pro are excellent for reducing background noise, ensuring clear sound in noisy classrooms.
Lighting: The Neewer 660 LED Video Light is portable and adjustable, making it ideal for various classroom setups.
Post-Production Tools: Computers with at least an i5 processor and editing software like DaVinci Resolve or Adobe Premiere Pro streamline the editing process.
By focusing on these features, you can create a professional setup that meets your classroom needs. Avoid spending on unnecessary extras that do not directly improve the learning experience.
Utilizing iDste’s One-Click Operation and Smart Integration
The iDste Recording Classroom Construction Solution simplifies the recording and broadcasting process with its innovative features. Its one-click operation and smart integration make it a user-friendly choice for educators. Here’s how these features benefit you:
Simplifies the setup process, enabling easy recording of lectures and classroom activities.
Real-time sharing of resources
Enhances accessibility of teaching materials across different classrooms and devices.
With one-click activation, you can start recording or broadcasting instantly, saving time and effort. The real-time sharing feature ensures that students and educators can access lessons from anywhere, fostering an inclusive learning environment. These capabilities make iDste a practical and efficient solution for modern classrooms.
Tip: Leveraging iDste’s smart integration allows you to focus more on teaching while the technology handles the complexities of recording and broadcasting.
Recording and broadcasting of classroom construction programs revolutionize education by making lessons accessible and engaging for all students. Proper planning and selecting the right tools ensure a smooth implementation process. Address challenges like ensuring equal audio quality for remote learners by using integrated audio systems or reducing background noise with acoustical modifications. The iDste Recording Classroom Construction Solution simplifies this process with its user-friendly design and advanced features. Explore these resources today to enhance your teaching environment and create a more inclusive learning experience.
FAQ
What is the main purpose of recording and broadcasting classroom construction programs?
Recording and broadcasting aim to make education more accessible and interactive. You can share lessons with students who cannot attend in person, create a resource library, and improve engagement. These tools also help you document progress and enhance collaboration among educators and students.
How can you ensure high-quality audio and video recordings?
You can ensure quality by using reliable equipment like lavalier microphones and HD cameras. Position the microphone close to the speaker and adjust the camera focus. Proper lighting also improves video clarity. Test your setup before recording to identify and fix any issues.
Is it expensive to set up a recording and broadcasting system?
Not necessarily. You can start with low-budget options like free software (e.g., OBS Studio) and basic cameras. Repurposing existing equipment, such as smartphones or old laptops, also reduces costs. Focus on essential tools first and upgrade as needed.
How does the iDste Recording Classroom Construction Solution simplify the process?
The iDste solution offers one-click operation and smart integration. You can start recording or broadcasting instantly. Its unified platform allows you to manage all devices from one interface. This system saves time and ensures a seamless teaching experience.
What are the legal considerations for recording classrooms?
You must obtain consent from students and parents before recording. Use clear consent forms explaining how the recordings will be used. Follow privacy laws like FERPA by avoiding sensitive information in your videos and using secure platforms for storage and sharing.
Click the button to contact us for more information